Notes (ver 4.5 & up)


Introduction

  Logos provides the ability to add notes/comments to our resources. The way we do this is to create a Notes file from the Documents menu and then add individual notes within that file. We can create as many Note files as we like and add as many individual notes within that file as we like (although very long Note files can cause Logos to respond more slowly). You can add notes to virtually any resource in your Library.


Highlighting and Notes

Before we move on we need to be aware that Highlighting is also documented in a Notes file:

Function Method Where performed What happens Further Action
Notes Right-click menu
(selected text)
In your resource The text is highlighted and a Note Indicator is added.
A note is created in a Notes document and linked to the resource.
The Note file is opened.
Enter your comment.
Highlighting Highlighting tool
(selected text)
In your resource The text is highlighted.
A note is created in a Notes document and linked to the resource.
If you want to enter a comment
you have to open the Note file

Primarily this wiki will address notes as a traditional annotation, but you can apply the same attributes to Highlighting in an individual note; including a Note Indicator. Also, you can apply a Highlighting style to your notes. So the major difference is how you apply Highlighting and direct it to a Notes document. Instructions for these can be found in the Highlighting wiki.


the ‘Right-Click menu’ method

This will be discussed in detail below but you should understand that there are two ways for notes to be linked to your resources:

  • The Selection choice will direct Logos to attach your individual note only to that resource. The reason that your individual note is attached only to the resource where you created it, is that your book uses unique word(s) which cannot be readily associated with other resources. When using the Selection choice, Logos will apply yellow highlighting to the words that you selected in your resource (by default), and a yellow box (by default) will appear near your selection; this is the Note Indicator. You will find that you can change how these actions will appear in your resource.
    • Note that a Visual filter Corresponding Notes and Highlights uses reverse interlinear functionality to display Notes and Highlights that you attached to biblical texts e.g. a note/highlight in a Greek bible can be displayed in your reverse interlinear ESV, NIV, NASB bible, and vice-versa!

  • The Reference choice will direct Logos to attach your individual note to the resource that you are in as well as other resources. There are various kinds of Reference including Headword e.g. a lookup word in a dictionary/lexicon. They will appear in the right-click menu on the right side beneath Selection. The other resources which are attached to your individual note have to be Indexed for the same reference type (e.g. Bible reference, Strong’s number, Headword, etc) as your original resource. They will also need to have the same value e.g. same Bible reference, same Strong’s number entry, same Headword entry, etc. Logos will by default apply a yellow box Note Indicator in your resources. The text you may have selected is not highlighted since this choice uses your reference. You can change how the Note Indicator appears in your resources.

    Basic differences between Selection / Reference

Shows in Multiple Books2 Is text highlighted Can Show Note Indicator3
Selection     No    Yes    Yes
Reference1     Yes    No    Yes

  This ignores the impact of Corresponding Notes and Highlights (above).

  1 Reference can be: Bible References, Original Languages, Strong’s number, Headwords, or others (see your book’s Index).
   See this wiki page on a book’s Index.
  2 To show in multiple books,
     (a) they must be Indexed with the same reference.
     (b) your reference must be found in the other book.
  3 The Note Indicator,
     (a) by default this will be a yellow box.


parts of an Individual note

    
   Inside an individual note are 4 areas as shown above [note: when adding a note using the Add note button, section (B) is not present]: (A) Note Indicator, (B) Reference, (C) Title, and (D) the Content area. The default Note Indicator will be a Yellow box but you can change the Note Indicator by clicking on it and a drop down menu will appear. The Reference is added by Logos when you use Right-Click and Highlighting methods for adding your note. This reference is a hyperlink, which will take you to the resource where your note is attached. The format of the reference will vary depending on which type of resource e.g. Bible reference, Headword reference, etc). The note Title will automatically be populated when using the Right-click (with Selection) or Highlighting methods and should not be edited. The Content area is where you would enter your text for your individual note.

the Note Indicator

  The Note Indicator will appear in your resource when you use the Right-click method. The default for the Highlighting method is None. In the Right-click method your Note Indicator can show up in multiple books when you select Reference or Headword in the Right-click menu. This is useful when you want to add a note in a Bible referenced to a [Bible book/chapter/verse] and have it appear in your other Bibles; the Note Indicator will also appear in your Commentaries since they are Bible referenced. Similarly you might want to put a note in a Lexicon and have it appear in other lexicons.
  When you select Selection in the Right-click method, the Note Indicator and highlight will appear only in the book that you right-clicked to add your note.

  In your resource you can move your mouse over a Note Indicator and Logos will show you a pop-up containing some or all of the content of your individual note as well as the name of the Note file. If you click on the Note Indicator in your resource, Logos will open that Note file if it is not already open and position it to the specific note you clicked on.

Individual note Placement in a Note File

   When notes are added they are placed inside your Note file where Logos thinks they need to be. Notes added via the Add Note button are added to the bottom of the Note file. Notes added via the other 2 methods may be placed in canonical or alphabetical order within your Note file. You can move a note to different position within your Note File (see Moving a note’s position). Keep in mind though if you Sort your notes via the Note menu that your order is lost.


Creating a New Note File


  1. In the top menu click on Documents. In the drop down menu click on Notes.

      Don’t forget to Name your Note file!
  2. Click on the Name box, then type in a name for your Note file. If you use a name that already exists for any other document, then Logos will append a number to the end of your Note file name.


Opening an existing Note File

  • You can edit or add new menu items to a previously created Note file.
  1. In the top menu click on Documents, Logos will show a drop down menu.
  2. Locate the Note file that you want to open in the list on the right side of the drop down menu. Then click on the Note file that you want Logos to open.
    Hint: You can drag the Note file name to a location in your layout to have your Note file opened in a panel that you desire.


Adding notes to your Note File

Adding a note using the Right-Click menu

 This is performed inside your resource when you right-click with your mouse over a word or right-click on text that you have selected. When the Right-Click menu appears you will have 2 basic ways in which to direct how your individual note will function: Selection or Reference (Headword works similar to Reference). After selecting one of these ways, you will need to select the Note file for your note. If you do not have a Note file open, then Logos remembers the last Note file that you used and shows that. Once that you have clicked on a menu entry for your Note file, Logos will open (or make it active if already open) your Note file and insert your new note.
Hint_: If you don’t see the Note file that you want to use in the list, click outside the Right-click menu to close it, then use the Documents menu to open your Note file. Then you can repeat the Right-click to add your note.

  1. In the resource where you want to create a note, use your mouse to select the text and then right-click the text


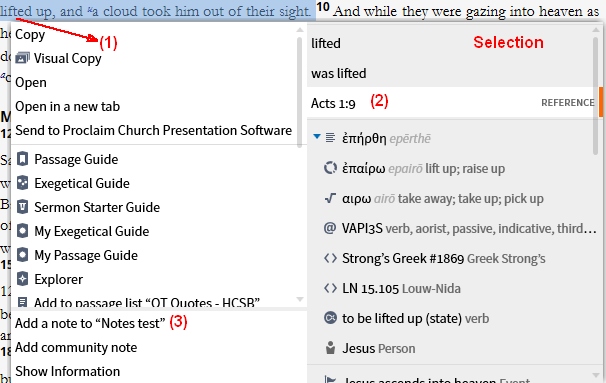
  2. Logos will show you a pop-up menu. Now select the method to be used for your note on the right side of the pop-up menu
    • If you click on Selection, then your note will be attached only to this book and the text will be highlighted. For more info see Selection.
    • If you click on Reference or Headword (headwords can appear in dictionaries, lexicons, etc) then your note will be attached to this book and others which are indexed to that reference or headword. For more info see Reference.
      The illustration here is that of a Bible – you will see different options if you right-click on books which are indexed with references other than Bible.
  3. Now on the left side of the pop-up menu select the Note file that you want your note added to. If you have Note files open then they will appear here.

    In this illustration we used Reference, the resulting note addition is shown below

  4. Notice the Note Indicator is set by default to Yellow box. If you want to change this, click on the Note Indicator and select the Indicator shape and color (see Changing: Note Indicator or Highlighting).
    Hint: If you don’t want your Note Indicator to appear in your resources, you will need to click on the Note Indicator and select None
    Hint}}_: If you don’t see the Note Indicator in your resources, you may need to make sure that your note file is checked in the Visual Filter Menu for your resource.

  5. Since we selected Reference Logos added in this case a Bible reference. If you click on that link Logos will take you to where the note was added in your resource.

  6. If you want to edit the Title area for this note, click to the right of the hyperlink and Logos will show an editable box where you can type your text for the title.

  7. If you click in the Content area you can start typing in your note’s content.


  8. I selected a yellow star for a Note Indicator and entered some text into the note (not shown):
    • Notice that Logos shows the Note Indicator in 2 versions of the Bible shown above since we used Reference when setting up our note. Sometimes Logos will place our Note Indicator next to a Heading or Pericope when there is no immediate Bible text before our verse number.
    • When I hover my mouse over a Note Indicator, Logos shows a pop-up displaying the contents of my note.


Using ‘Add note’ button to insert a note

The Add note method allows you to insert an individual note in your Note file. It is not attached to any resource. Logos will append your new note at the bottom of your Note file. This is a very useful method, since many times you will want to add a note and not have it attached to a resource.

  • This method will insert a blank individual note into your Note file.
  • The Note Indicator will not be shown in any of your resources.

  1. You will need to have your Note file open first, since the Add note button is located on the toolbar.


  2. Click on the Add note button.
  3. Click in the Title area and type in a title if you desire. Then click in the Content area and type in your comment.


Changing: Note Indicator or Highlighting

  • Clicking on the Note Indicator icon beside your individual note allows you to change the Note Indicator.


  • What is displayed in the drop down selector depends on which type of note you created:
    • Notes created using the Reference or Headword will only show the Note Indicator selections.
    • Notes created using Selection or Highlighting will show you the Note Indicator selections as well as the Highlighting selections.
  • The default Note Indicator is the Yellow box.
    • The default Note Indicator for Highlighting is None.
  • The default highlighter style is Highlight with note color. This applies to notes created using Selection.
  • You can click on the link Use this style by default at the bottom of the drop down selector to have Logos remember what you want to use.
    • Logos will apply this Note Indicator to any new individual note added to any Note File.
    • Logos will remember this new default even after closing Logos.
    • If you have set a Highlighting style, it will be remembered and applied when using Selection. As well as the Note Indicator style.
  • You can click on the link Reset at the bottom of the drop down selector to have Logos to revert to the default Note Indicator & Highlighting.


Note Indicator

 Hint: If you apply a Note Indicator to your Highlighted text, you can easily jump to your note by clicking on the Note Indicator in your resource. This is useful if you have added text in the content area of your note.


  1. Click on the Note Indicator icon beside your note.
  2. Select the Note Indicator shape that you desire for this note.
    • This shape indicates None, which will not show a Note Indicator for this individual note in your resource(s).
  3. Select the Note Indicator’s color.
  4. Click outside the drop down selector to hide it.
    Hint: It may take a few seconds for Logos to apply your changes to your open resource(s).
    Hint: If you don’t have this Note file checked in the Visual Filter Menu, then you will not see your changes in the resource.


Note Highlighting

  • If you click on the Note Indicator next to your note and you don’t see the Highlighting selection area, then you created this note using Reference or Headword method.
  • The default highlight for a note created by the Selection method is Highlight with note color.
  • You cannot apply multiple highlights to a single note. But you can select a portion of the text again in your resource and create another note, and then apply the secondary highlighting.


  1. Click on the Note Indicator icon beside your note.
  2. In the drop down selector, scroll down to find the hightlighting style that you want applied to your text in your resource.
    Hint: Since the drop down selector remains open, if your resource is visible, you can change the highlighting style to different styles while viewing them in your resource without having to click on the Note Indicator icon again.
  3. Click outside the drop down selector to hide it.
    Hint: It may take a few seconds for Logos to apply your changes to your open resource(s).
    Hint: If you don’t have this Note file checked in the Visual Filter Menu, then you will not see your changes in a resource.


Editing a note Title

  • Many notes will have 2 parts in the Title area: a) hyperlink section, b) Title section.


    • the hyperlink section cannot be edited as Logos adds this when the note is created.
    • notes created by the Selection and Highlighting methods will have a Title that represents the text that is highlighted.
      Logos abbreviates the text when it does not fit into the Title section. You will see the ellipses (...) when this happens.
      • You cannot change the words that are highlighted. You will have to create another note by re-selecting the words in your resource that you wish to be highlighted.
    • notes created using Add note and the Reference/Headword method are not given a Title and can be freely edited.
  • You may click in the Title section and Logos will show the text in an Edit box.
    Note that not all Text Features are avaialble in the toolbar.


    • Logos will scroll the text when it will not fit in the box.


Editing text in a note’s Content area

  • When you click in the Title section of an individual note, Logos will display the Content area. Then click in the Content area to enter/edit your comment.


  • A feature rich text editor provides many of the formatting features of a Word Processor. But:
    • you cannot paste pictures.
    • you cannot directly enter a Table.
      Hint: You can paste a table from MS Word into your note and edit the content of individual cells. Logos will resize the table each time the Note panel/window is resized.
  • Try not to make your Note file excessively large e.g. large amounts of text/comment in a several individual notes. Large Note files can affect responsiveness.


Global settings for your Note File(s)

  • In a Note file when you click outside of the edit boxes (or press Esc on your keyboard), you will notice in the toolbar that some items are enabled and others are not:


    The items that are enabled pertain to global settings for a Note file.
  • But changes to any of the items outlined below will be applied to other Note files.


  • Changing the global settings will not effect your previously entered notes.
  • The global feature can be useful when you want one or more text features applied to new notes. This saves you the time of manually applying the feature(s) in each note.


Setting Default Notes Font in Program Settings

  • You can change the Default Notes font from Program Settings.
  • This will change all text within every Notes document whose font is set to Default.
  • You can still change an individual note’s font from its toolbar.

    1. In the top menu click on Tools. In the drop down menu click on Program Settings.
    2. In the Program Settings window, scroll down until you see Text Display. Then click on the font adjacent to Default Notes Font and select your desired font.


Summary: Effects of Text Features at different levels

  • Some text features/formatting can be changed in several places. The effects are summarised in the following table:
Location Description Change
Existing Text?
Program Settings
(Default Notes Font)
Determines the font for all Notes set to Default Yes (if set as Default)
Global
(Note file)
Over-rides Default Notes Font
Over-rides some Global features
(outlined below) in other Notes files

No
No
Local
(Individual note)
Over-rides Default Notes Font
Over-rides Global features
Selected text only
  • NOTE: Individual note Titles always use the Default font. You can manually change a title’s font in an individual note.


Text Features

  • Virtually everyone has used text formatting features similar to those in the Note file’s toolbar. So explanation of these features will be fairly brief.
Icon Feature Function
Font type Allows you to select a font from a drop down menu.
Font size Allows you to set the font size in points
Bold Toggles whether text is Bold or not Bold
Italics Toggles whether text is Italic or not Italic
Small Caps Converts lower case text into small capital letters.
The height of the capital letters will be shorter than normal capital letters.
Alert: Does not work in all fonts. Tested in [Default], Calibri.
SuperScript Converts text to superscript format (e.g. like footnote number abc1 or numeric exponent 23)
SubScript Converts text to subscript format (e.g. Hello1232)
Text color Allows you to select the color for text from a drop down menu.
Text background color Allows you to select the background color
for text from a drop down menu.
Text Alignment The drop down menu allows you to set the alignment
Left, Center, or Right.
Bullets Toggles text lines to use or not use bullets on the left.
Numeric List Toggle text lines to be prefixed with sequential numbers.
Outdent Decreases the indention of a line.
Indent Increases the indention of a line.
Text Direction Toggle text direction LtoR and RtoL
Hyperlink Allows you to insert a link address for selected text.
See Hyperlinks below.
Spell Check Choose your language for Spelling Check
Default Formatting Apply default formatting to text


Keyboard shortcuts to Text Features

  • The chart below shows your keyboard shortcuts which you can use when entering your notes.
key presses action
Ctrl + B toggles Bold
Ctrl + I toggles Italics
Ctrl + U toggles Underline
(This feature does not appear as a tool in the toolbar,
but works when applied to selected text using the keyboard)
Ctrl + Shift + K toggles lower case to lower case caps
Ctrl + Shift + + toggles superscript (E = mc2)
Ctrl + = toggles subscript (H2O)
Ctrl + L left justify text
Ctrl + E center text
Ctrl + R right justify text
Ctrl + . (period) toggle Bullet list
Ctrl + / toggle Numbered list
Ctrl + M increase indentation
Ctrl + Shift + M decrease indentation


 As a concise way to document where you found information, Logos allows you to create hyperlinks in your notes. You can link to Bibles, commentaries, dictionaries, guides, and many other resources/tools. You can tell if the resource/tool can be linked to by opening its panel menu and looking for Copy locations as:.
 When linking to some documents/tools Logos may not be precise with its location. For instance if you link to a Note or a Clipping, Logos will only link to the document (not the individual note or clip).


Position the resource so that the desired location is at the top of the panel.
If the resource has a Reference box make sure that the desired reference is displayed.


  1. Click the panel icon to display its menu.
  2. Click on L4 next to Copy location as:.
    If that is not available click on URL.
  3. Logos places the address into the clipboard (for pasting later).
    Hint: For subsequent use, position your resource and press Ctrl+Alt+C (Mac users: Option+Command+C) on your keyboard.


 Logos does this automatically for you when you type a scripture reference in your note, so you do not need to get a link as described above. You can use abbreviations to books but Logos requires that the first letter of the Bible book be capitalized and you must type a space after the reference before Logos will automatically link it (then you can replace it with a parenthesis, punctuation, etc.).
 If this does not work, or if the reference is/must be non-standard, try this:

  1. select the reference
  2. click on the Hyperlink icon (like a chain link) and type the Bible reference into the Hyperlink box.

 When you hover your mouse over a link (d), Logos will show you a pop-up of the scripture verse:

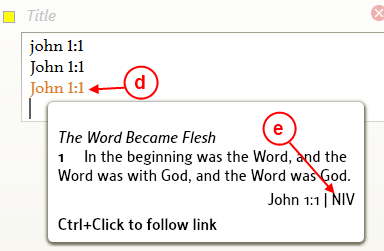
  • Notice it shows you which Bible the link is using (e).


  1. If not already entered type the scripture reference in your note (format is not important).


  2. Now go to the Bible and get the desired hyperlink address


  3. In your note, select the required text/bible reference.
  4. Click on the hyperlink icon (chain link icon). A drop down hyperlink box appears.
  5. Right-click in the hyperlink box. In the drop down menu click on Paste.


  6. In your note, click somewhere off of the selected text to deselect the text.
  7. Hover your mouse over the new hyperlink. Logos will show you a pop-up box with the verse inside it.
    • Notice that your Bible version is showing at the bottom. This is a good way to verify that your hyperlink is to the correct Bible.


  1. Go to the resource and get the desired hyperlink address.

  2. Now in your note select the text that you want the link attached to.


  3. In the Note File’s toolbar click on the hyperlink icon (chain link icon). Logos will show a drop down hyperlink box.
    • Right-click in the hyperlink box and in the drop down menu click on Paste.


  4. Now in the note, click away from the selected text to have Logos deselect the text.
    • With your mouse hover over the new link. Notice that Logos shows you a pop-up window with text from your linked resource.
    • Also notice that the resource’s title is shown at the bottom.
    • To open this resource from your note, hold the Ctrl key down (Mac user’s: Cmd key) and with your mouse click on your link.


 You can also create hyperlinks to documents such as PDF files, PowerPoint and Word, or to pictures, MP3s, Videos, and executable programs. These hyperlinks will not open the documents inside of Logos, but have your computer open them with the appropriate program.

  1. Create a full Path & Filename for the document that you want your new hyperlink to open and add it to your clipboard.
    If you are unfamiliar with creating the Path & Filename and are a Windows user, please see the tutorial: Creating a Full Path & Filename.


  2. Select the text in your note that you want to show as a link.
  3. Then in the Note File’s toolbar click on the hyperlink icon (chain link icon). Logos shows a drop down hyperlink box.
    • Right-click in the hyperlink box and in the drop down menu click on Paste (this pastes the Path & Filename that you added to the clipboard in step 1).

  4. Click somewhere away from the selected text to have Logos deselect the text.
    • Now with your mouse hover over your new link. Notice that Logos shows us a pop-up with some cryptic text for a link to our file.
    • If you hold the Ctrl key down on your keyboard (Mac users: Cmd) and click on the link with your mouse, Logos will signal your computer’s operating system to open the file with the appropriate program.


 You can also create hyperlinks to internet webpages in your notes.


  1. In your web Browser, navigate to the webpage that you want to link to in your note.
    Right-click in the address bar and in the drop down menu click on Copy.

  2. In your note select the text in which you want your link attached to (drag your mouse over the text to select the text).
  3. In the Note File’s toolbar click on the hyperlink icon (chain link icon). Logos shows you a drop down hyperlink box.
    • Right-click in the hyperlink box and in the drop down menu click on Paste.

  4. In your note click somewhere outside the selected text to have Logos deselect the text.
    • With your mouse hover over the new link. Logos shows you a pop-up box showing the webpage address for the link.
    • If you want to jump to that link, hold the Ctrl key down on your keyboard (Mac users: Cmd) and use your mouse to click on the link. Logos will have your Browser open the webpage for that link.


Notes Management

Viewing your Note file

  • Logos gives us two views which can aid us in viewing our Note File: Full and Compact.


  • When you select FULL view, Logos shows all individual notes expanded.


  • When you select COMPACT view, Logos shows individual notes compressed
    • When you click on a note, Logos will expand that note.
    • In this view only 1 note may be expanded at a time.
    • In this view, if you click outside a note or press ESC on your keyboard, Logos will show no notes expanded.


Moving a note’s position

  • Since Logos places new individual notes where it thinks best within your Note File, you may wish to reposition a note to a different location inside the Note File.
  • Warning: Your new positions can be disturbed when you Sort your notes.
  • You can only move one note at a time.
  • You move notes by using the Drag-and-Drop method.
  • There are some illustrated Step-by-Step instructions in the older Note wiki page that will show you:


  1. Click under the Note Indicator and to the left of the Content area, keep the mouse button down ...
    Hint: If you are viewing your notes in the Compact view, then it might be easier to click on the blue vertical bar to the left of your note.

  2. with the mouse button still down move the mouse towards the location where you want the note to be placed. Notice that Logos shows you a horizontal gray line indicating where your new location will be. When you get the gray line where you want it, release the mouse button and Logos will move your note.
    Hint: If your new location is not visible on the screen (it is above or below whats showing in the window), then move close to the top/bottom of the viewing area of the Note File’s window (while keeping the mouse button down) and Logos will incrementally show the other notes which were not visible.

      
    • Now you should see your note in its new location.


Indenting a note

  • Indenting individual notes can help you organize your notes by indicating their relative importance.
    Warning: If you sort your notes, this may rearrange the order and your indented notes may not be under your original non-indented notes.
  • You can indent more than one level by clicking on the Indent icon more than once.


  1. Click in your individual note to make it the active note.
  2. Above the toolbar click on the Increase indent icon.


  3. Now notice that your note is indented.
    • Click on the Decrease Indent icon to restore its position


  4. As in the image above, you can see that indention can help you organize your notes.
    • You can use the Add note button to create a heading note for your indented notes. If you do this after entering the other notes you may need to move the newly added heading note, see Moving a note’s position.


Sorting your notes within a Note file

  • You can sort your individual notes within your Note File. You will find four sort methods in your Note’s menu. These are summarized in the table below.


  1. In your Note File click on the Note File’s icon.
  2. In the drop down menu click on the sort method that you want applied to your current notes.


Sort Method Details
Sort by reference Allows you to sort by Bible reference. Logos uses the Bible reference in the hyperlink portion of the title.
Sort by date created Allows you to sort by the date you added each individual note.
Sort with oldest note at the top or newest at the top.
Sort by date modified Allows you to sort by the date you modified each individual note.
Sort with oldest note at the top or newest at the top.
Sort by title Allows you to sort by the first word in your note’s title.
Sort by note color Allows you to sort by the color of your Note Indicator for each individual note.


Deleting a note

  • Eventually you will need to delete an individual note within your Note File.
    • Use caution when deleting notes so that you don’t delete something important!
  • When you delete a note, it will also remove any Note Indicator and Highlighting from your resources.


  • Hover your mouse over the Title of the note that you want to delete.
    A down-arrow will appear to the right of the Title, click on it and select Delete note.
    Hint: If you accidentally delete the wrong note, you might be able to restore it if you immediately press Ctrl+Z on your keyboard (Mac: Cmd + Z).


Deleting a Note file

  • Eventually you will need to delete a Note file from your documents.
  • All individual notes/Higlighting will be removed.
  • If you inadvertently delete the wrong Note file, it can be restored from My Documents.

  1. In the top menu click on Documents.
  2. In the drop down menu on the right side locate the Note file that you want to delete and right-click on its name.
  3. In the pop-up menu click on Delete.


Printing your Note File

  • You can print your Note File. You cannot print individual notes.


  1. Select the Full view method to view all your individual notes (titles & contents). If you select Compact view, Logos will only print: Note Indicator and the title for each note.
    Hint: You can skip the steps below by pressing Ctrl P on your keyboard (Mac users: Cmd P).
  2. In your Note File click on the Note File’s icon.
  3. In the drop down menu click on Print/Export.
  4. For more details on using the Print/Export window, see the Print/Export wiki page.


Finding text in Note files

Using Search tool to find text in notes

  • Please see this wiki page: Search for text in Your Documents, it gives you step-by-step instructions on how to do this.
    • the results will take you to the individual note and will show the context of any hits in the Content area.
  • If you know which Note file to search you can use the Find method below.


Using Find in your Note file

 In your Note File, when you use Find Logos locates and shows the individual note where it found your search word(s); hiding the other notes.


  1. Click on the icon for your Note File to open it’s menu. Then in the menu click on Find (in this panel).
    Hint: Or you could just use the keyboard shortcut Ctrl F (Mac users: Cmd F).


  2. The Find box will drop down over the toolbar. Type the word(s) that you wish to find. Logos will look for your word(s) in the Title and Content areas, and Tags of each individual note.
  3. To clear your search word(s) you can click on the x in the right side of the Find box. All your individual notes will reappear when you do this. You can then type in a new search word(s).
  4. To close the Find box click on X in the right side of the Find drop down tool bar.


Save as Passage List in your Note File

  • Logos provides a way to save scripture references into a Passage List from a Note File’s menu.
  • Scripture references which appear in the Reference area of your individual notes will be the scripture references which will appear in your new Passage List.
    • Scripture references which appear in the Title or Content area of your individual notes will not be added to the Passage List.


  1. Click on the icon for your Note File to open it’s menu. Then in the menu click on Save as Passage List.


  2. Logos will glean all scripture references from the Reference area of your individual notes ...
    1. ... and add them to a new Passage List. Don’t forget to name your new Passage List!
  3. Notice that Logos did not glean scripture references in the Title or Content area of the individual notes shown above!
    (note: the Col 1:17 was manually typed into the Title areas of these 2 individual notes.)


Adding scripture references from inside an individual note to a Passage List

  • You can have Logos glean scripture references from the content area of an individual note by using the method shown below.
    • You will need to do this on each individual note where you want it’s content gleaned. Logos does not provide a way to glean from more than one individual note at a time.


  1. With your mouse drag over the content of an individual note to select the text area that you want Logos to glean from.
    1. Then right-click on the selected text, in the pop-up menu click on Copy to add the selected text to your clipboard.


  2. Now in your Passage List click on Add and in the drop down menu click on Clipboard. Logos will glean all scripture references from the text in the clipboard and add them to your Passage List.
  3. Logos does not recognize selected text in a Note File, so don’t click on Selected text.


Problems?

I don’t see my note in my book or other books

  • Did you enable the Note file in the Visual filter Menu?
    • Make sure that your Note file is checked under Visual Filters.
    • If it appears when you check the Note file under Corresponding Notes and Highlights then you know that the note did not originate with this resource.
    • In the Note file, click on the Note Indicator beside your note. If you see the Highlighting styles in the drop down, then the reference will tell you where it was created and that it can only appear in that resource.

  • So if this is a resource other than the resource that you originally created your note in:
    • check this resource’s Info to make sure that it is Indexed according to how your original resource was.
    • check to make sure your reference/headword is found in this resource.
    • then recreate your note using the Reference/Headword type in the Right-Click menu

The font in my note is now different

  • The most common cause is that you changed the Default font for Notes in Program Settings.
    Hint: When you set the font in your Note file and/or your individual note to Default, then it will follow the font that you set in Program Settings.

  • If you have set a specific font for text in a note, it will over-ride the font that you set in Program Settings.

  • If you have set the current font globally in your Note File and have set the font in the current individual note to a different font, then in the individual note, select Default while in your individual note.

I deleted my Note file, HELP


Logos Bible Software Wiki

Welcome, Guest! (sign in)