Text Comparison
Updated for Logos 10+
Page Contents
What is the Text Comparison tool?
- The Text Comparison tool will allow you to view and compare the text of multiple Bible translations side-by-side (default). Comparison features like Show Differences highlights difference in other Bibles relative to the first/base Bible in your list. Show Base Text shows text found in the base Bible (with a strike-thru) relative to each of the other Bibles.
- If you open it in a narrow tool window the verses will be aligned vetically, and not in columns.
- Text Comparison allows you to scroll through passages but it can still be set to follow your Bible.
Opening the Text Comparison tool
- To open the Text Comparison tool:
- Click on Tools in the top menubar.
- Click on Text Comparison in the drop down menu.
Or see When hovering in a Bible
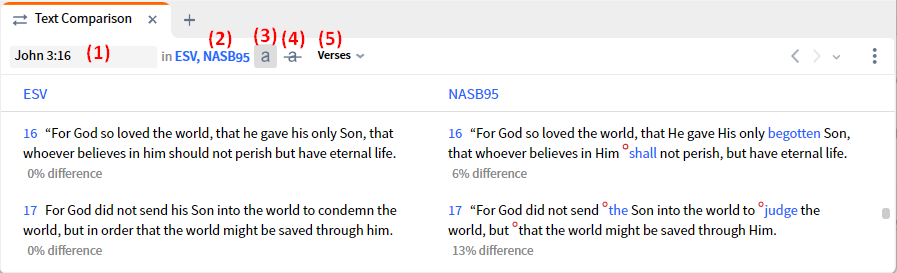
- Reference box.
- Bible list.
- Show differences button.
- Show Base text button.
- Interlinear view (default is Verses).
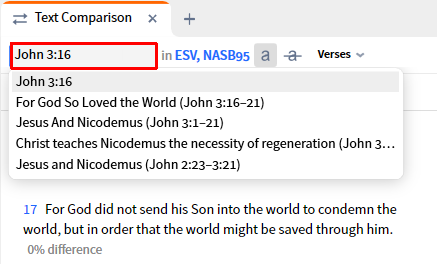
Reference box
- In the Reference box, start typing a Bible reference and Logos will show you a drop down list of the verse you are entering along with pericopes (headings).
Bible list
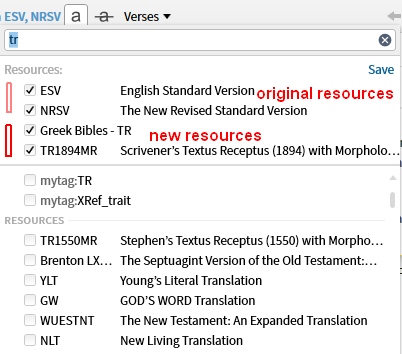
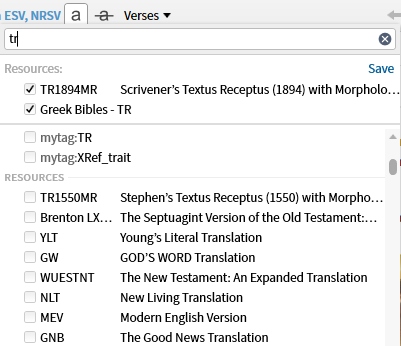
- It shows which bibles to compare. The first bible is the base version, against which the others will be compared.
- Click the Bible list to get a drop down menu with a Find box. Clear the Find box if necessary (click the X) and start typing the name of a Bible. The menu list will change to reflect your entry, which could be a recognised bible abbreviation like ESV, etc. It will include matches with collections, tags, and recent and saved resources.
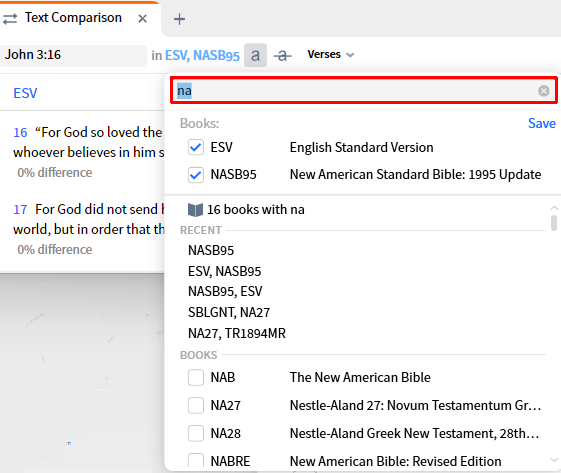
- Make a choice from the bottom Books list and click so that it goes into the top Books list.
- Drag the resources into the order you want
- You have now added a resource to the existing Bible list.
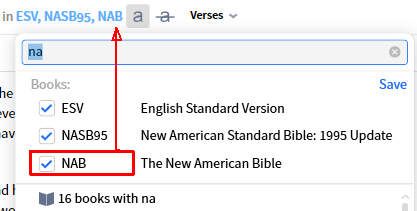
- Click outside the menu and your bibles will be compared.
- Don’t press Enter on your keyboard. It doesn’t work.
See Other Methods of input for other ways to use the Bible list.
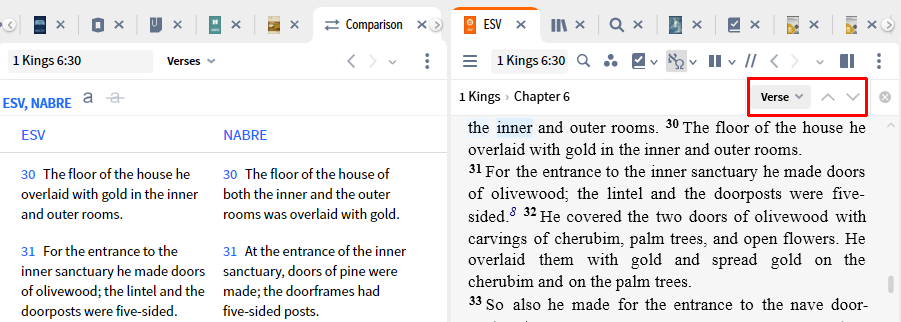
Show Differences
- Show Differences will allow you to see difference between Bible translations relative to the base version (first Bible in your list).
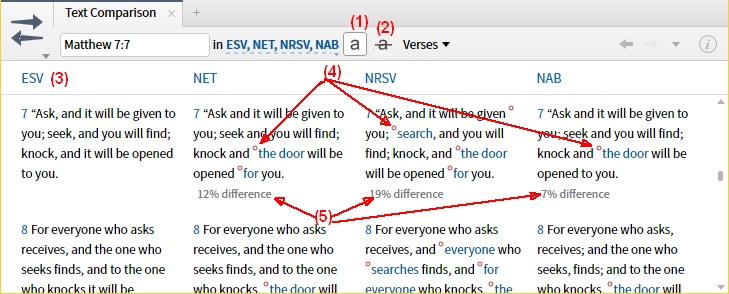
- Click on the Show Differences button (the first a to the right of the Bible list).
- Show base text is OFF
- Your base version is the first Bible on the left.
- The other Bible version(s) are compared to the base.
- Notice the red degree symbol (small red superscripted circle) next to the blue text. These are differences between the base version’s text.
- Notice the percentage difference under each compared version.
- If you click on Show Differences again, it removes the visual difference markings.
- If you are using Original language Bible versions you might find it useful to use these Additional controls.
Show Base Text
- Show Base Text is active only when Show Differences is ON

- Click on the Show Differences button to turn it ON (if necessary).
- Click on the Show Base Text button so that it is ON.
- Notice that the words that are crossed out are the words from the Base text which were not found in this position of the compared Bible version.
- Notice that words which were different from the Base text version are blue.
- Clicking on the Show Base Text button again will turn it OFF.
- If you are using Original language Bible versions you might find it useful to use these Additional controls.
Interlinear view
NOTE: This feature requires an Internet connection and bibles that have a Reverse Interlinear (RI).
It does not works with all RI bibles, so some of your bibles could be absent from the comparison.
Select another base version if you get an error message stating “There are no results...”.
- Click Verses in the toolbar to select the Interlinear view
Verses is the normal/default view.
- Reverse Interlinear resources are shown and compared line by line:
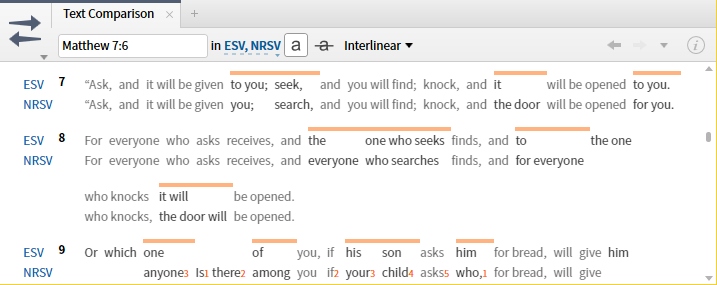
- Show differences is ON. Show Base text is OFF.
- An orange line highlights the word differences.
- The small numbers adjacent to the text on the last line are explained here.
Window options
- When you click on the icon for this tool, the panel menu drop down appears:
Layout orientation options
- You can pick one of the following:
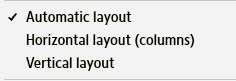
- Automatic This will determine the best method (Horizontal or Vertical) depending on the panel width and the number of bibles being compared.
- Horizontal Display Bibles horizontally (columns).
- Vertical Display Bibles vertically (similar to paragraphs).
Comparison Features
- These are the default settings for the tool.
They can also be managed in the toolbar:

- Show Differences Differences will be shown in a manner that depends on the next option.
- Show Base Text Show base text in differences.
Additional controls used with Comparison Features
- You can turn On/Off any or all of these when Show Difference is active:
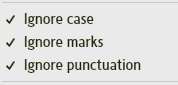
- Ignore Case When checked, the comparisons will ignore the case of the letters.
- Ignore marks When checked, the comparison will ignore the accents and breathing marks in Original Language text.
- Ignore punctuation When checked, the comparison will ignore punctuation marks in the text.
When hovering in a Bible
- You can get a pop-up version of Text Comparison to appear when you are in your Bible or a Commentary.
- Input a range if you want to compare multiple verses.
- Press F7 and the pop-up TC will appear with your bible as the base version.
- MacOS: if “Use all F1, F2, etc. keys as standard keys” in Keyboard preferences is unchecked, then (fn) key needs to be pressed with F7.
- The versions in the pop-up will be your Top Five Bibles.
- To hide the pop-up Text Comparison, click in your Bible.
Linking Text Comparison
Linking Text Comparison (TC) works the same as most tools in Logos.

- Follow allows TC to follow which ever resource that you click.
- A,B,C,D,E,F allows TC to follow the resource in the corresponding Link set.
- None means that TC will only follow what you type into its Reference box.
As used here the quit action means click the mouse outside the menu.
Recent and Saved Resources
- The Bible list menu will show a list of Recent and Saved resource groups:
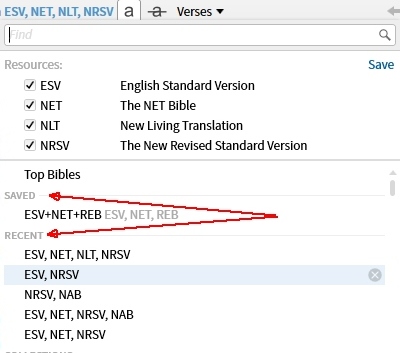
- Ensure the menu scroll button is at the top
- Click on one of the Recent/Saved resource sets
- Re-arrange by dragging and then quit.
Comma Separated list
The comma separated list is similar to other tools.
- Click the Bible list
- Clear the Find box if necessary (click the X).
- Type your bibles separated by a comma e.g. ESV, NAB, HCSB
- As these are recognised abbreviations, you will see a short Books list below (NAB caused NAB & NABRE to be present).
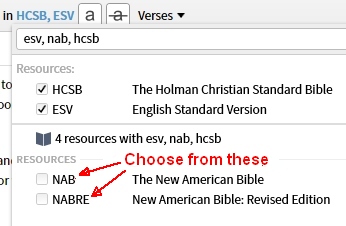
- If you see a longer list it is because the abbreviation is not recognised.
- Select the bible(s) you want from the bottom list of Books e.g. NAB
- In the top Books list drag the base version to the top.
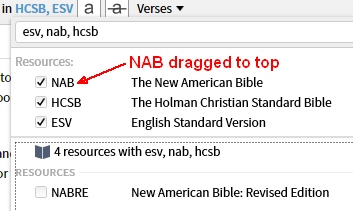
- Click ouside the menu to compare your bibles.
Using Collections
- When using a Collection (or a Tagged resource set) you may have noticed that you have no control in selecting a base version for comparison.
- To overcome this problem you have to ensure that the base version appears first in the Books list.
- Select the collection
- If the books appear individually in the list go to Step 3 below.
- Select the base version (it can be part of the collection)
- Delete any unwanted resources
- Drag the base version to the top
- Click ouside the menu to compare your bibles.
General tips
- If your input just isn’t working:
- Clear the Find box
- Uncheck your bibles in the top Books list.
- Start over
- When adding to existing Books:
- Clear the Find box
- Input the extra bible e.g. NIV
- Click the version of NIV you want
- If the top Books list doesn’t look right:
- Clear the Find box
- Check if the top Books list is what you want
- Remember to click outside the menu when finished.
Tip: how to navigate Text Comparison with your bible
You might want Text Comparison to scroll with your bible even though TC can scroll by itself.
- Open a Bible in one window and the Text Comparison tool in another.
- Link your Bible and the Text Comparison tool (not shown).
(see How do I link resources?).
- Change the navigation method to Verse in the bible.
(see Navigation choices).
- Click the navigation arrows in the Locator Bar to move one verse at a time.