Prioritizing
Updated for Logos version 24+
Page Contents
Introduction
When Logos offers a selection of books in/from a Guide, a Tool, or the Context menu, they can be ordered according to your preferences.
This is where Prioritization is used, otherwise Logos will determine which books it thinks are best.
The categories of books that you can prioritize includes bibles, commentaries, bible dictionaries, and lexicons.
It takes a little time to learn how to setup your Prioritization, but once done you will seldom need to change it
(you do not have to prioritize every book in a category).
Be aware that prioritization cannot be used to order the results of a Search (Basic, Bible, Morph, etc.).
Order in the Prioritize pane
In Logos you prioritize books by placing them in a list in the Prioritize pane of your Library (access via the Panel menu):
Books are used in the order top to bottom, where top has a higher preference.
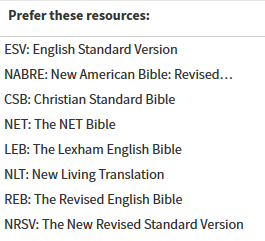
If you use the right click Context menu to open a scripture link (or reference) in a Bible, you will see a list of up to 5 bibles in the same order as above (where ESV is the preferred bible). Some of the Bibles will not appear in the pop-up menu because they have a lower priority, or because they do not contain the reference.
Features that are affected by Prioritization
| Feature |
Prioritized
Books Used |
Passage Guide Commentaries
(in a collection) |
Bible Commentaries
Prioritize Commentaries after Bibles, as they may be used instead of English bibles! |
Bible Word Study
(Lemma)
|
Lexicons |
Right-click Context menu
(English word ) |
Bible Dictionaries/Encyclopedias (top 5)
Be careful where you prioritize English dictionaries, as they may be used instead of Bible Dictionaries |
Right-click Context menu
(Bible Reference) |
Bibles (top 5)
Be careful where you prioritize Greek/Hebrew bibles as they may be used instead of English bibles! |
Right-click Context menu
(Lemma) |
Lexicons (top 5)
Prioritize Greek/Hebrew/Aramaic lexicons separately. |
Basic Prioritization
Preliminary Setup
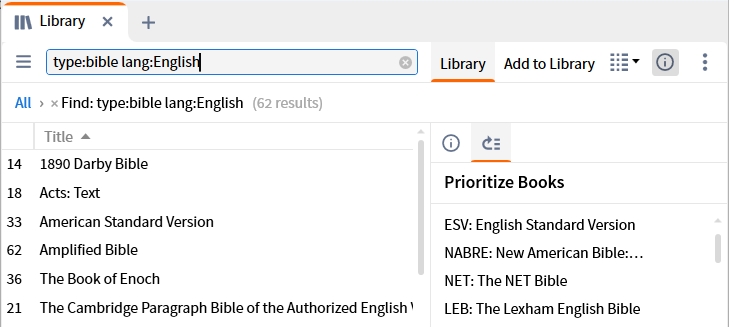
Before jumping into using the Prioritize pane, it is useful to know how to easily locate similar books before placing them into the prioritize pane.
This method will group books in the viewing area of the Library window per your filtering string that you enter in the Find box.
This helps you more easily find books for a specific category e.g. English Bibles or Hebrew Bibles. If you are not familiar with using filtering in the Find box, see Using the Find box to filter resources in Library.
- Open Library (a floating window is recommended)
- If you are in the Details view, then click on the column Title to ensure that all titles are visible.
- In the Find box, enter type:bible lang:English to filter Library for English Bibles.
- Click the Panel menu icon
 and select Prioritize Books.
- You can use other filter expressions for the other categories that you will want to prioritize:
- Use type:bible lang:Greek for Greek Bibles.
- Use type:bible lang:Hebrew for Hebrew Bibles.
- For other filters see the wiki page A Sample Prioritize List.
Adding resources to the Prioritize pane
This section will show you different methods to add a book to the Prioritize pane.
You will need the Library window open and the Prioritize pane showing as per Preliminary Setup.
- You can prioritize a series from any single volume of the set (the Series name will be in bold).
- You can also prioritize individual volumes of a set.
- In general Logos will only allow one copy of a book to be added to the Prioritize list, but:
- When using Advanced Prioritization, you can have multiple copies of a book.
This method adds your books to the bottom of the Prioritize list:
- Advantage: you can add multiple books at a time.
- Disadvantage: If you have a large number of books to add or if you already have a large list, it may be cumbersome to rearrange additions to locations which are close to the top of the list. So you may want to use drag & drop.
- In the viewing area of the Library window find a book that you want to add to the Prioritize pane.
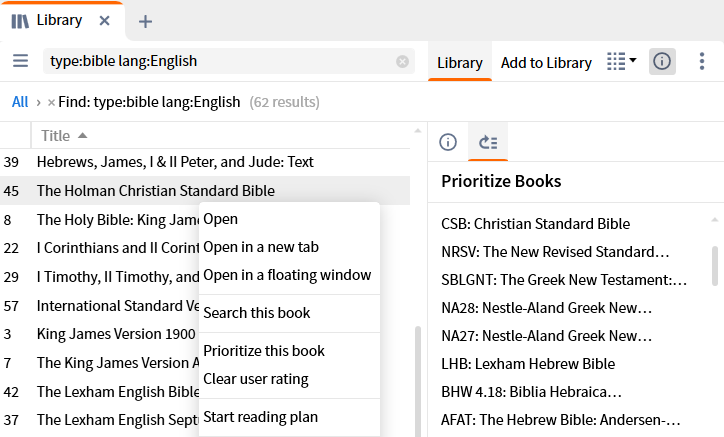
- Right click on the book and select Prioritize this book.
- if it is part of a resource series you may want to select Prioritize this series.
- You can select multiple books by Shift+clicking or by holding down the Ctrl key as you click on each book:
- right click on one of the selected books and select Prioritize these books.
- Logos will add these books/series to the bottom of your list.
So now you have to rearrange your resources according to the priority that you want establish.
Using drag & drop to add resources to the Prioritize pane
This method places your book where it is dropped, but if it is part of a series the whole series will be prioritized
(use the right click method above for a single volume).
- Advantage: you don’t have to rearrange books.
- Disadvantage: you can only move one book at a time.
Position the list in the Prioritize pane so you can easily drop your resource where you want it:

- Locate the book that you want to add and click on it; do not release the button.
- Drag the book into the Prioritize pane
- a black horizontal bar will move with it.
- once you get the horizontal bar where you want it, drop the book i.e. release the mouse button.
Rearranging resources in the Prioritize pane
You can rearrange resources in the Prioritize pane to change priorities.
This is done by a simple drag and drop operation:
- A book positioned above another like book has higher priority i.e. top to bottom within each category.
- Do not intermix your categories as maintenance of the list will be more difficult.
- Click on the book that you want to move.

- Drag (move) the book to where you want it and then drop it.
Removing resources in the Prioritize pane
You will probably find times that you want to remove a book from the Prioritize pane. This is simple to do:
- Right click on the book.
- Select Remove from this list.
Advanced Prioritization
Logos provides Advanced Prioritization of books in the Prioritize pane.
It enables you to specify which books of the Bible that a commentary is used for,
which Lexicon is used for Strong’s Numbers, which dictionary is used with a specific book, etc.
This typically applies when a book has several indexes e.g. Greek, Greek Strong’s Numbers, TDNT
and you want to restrict it to Strong’s Numbers (or Greek) so that it is not used for TDNT numbers.
The converse is to specify which lexicon will be used for TDNT, but it has to be prioritized above your other lexicons!
Invoking Advanced Prioritization of a book
- Locate the book in the Prioritize pane
- Right click on it and select Set prioritization limits (advanced):
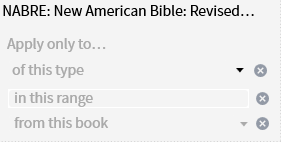
- The down arrow will show options for that field.
- The circle with an X will clear entries in that box.
The field boxes are labelled: of this type, in this range, and from this book.
You need to think about the book that you are prioritizing in relation to these fields:
| Field name |
Description |
| of this type |
contents of this field are a datatype like Bible, English, Greek, Greek Strong’s Number, Hebrew Strong’s Number |
| in this range |
a range relative to datatype. So if you selected “Bible” then your range would be books of the Bible.
If your type was “Greek Strong’s Number” then your range would be Greek Strong’s Numbers. |
| from this book |
if selected, prioritization will be retricted to datatypes from this book. |
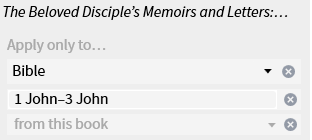
In this example we will set the Advanced Prioritization of the commentary “The Beloved Disciple’s Memoirs and Letters” so that it is used only for the epistles of John (1 John through 3 John).
Note that this volume also covers the Gospel of John, which is why we need to restrict the range to a portion of the book.
- If necessary, prioritize “The Beloved Disciple’s Memoirs and Letters”.
- Right click on the book in the Prioritize pane and select Set prioritization limits (advanced).
- Now set values for the first two fields:
- in the of this type box, click the down arrow and select Bible.
- in the in this range box, type: 1 John-3 John:
Now you can verify that the new prioritization is working:
- In the reference box of Passage Guide, type: John 3:16.
- “The Beloved Disciple’s Memoirs and Letters” should not be listed in your Commentaries section.
- It should only be listed with a passage from 1 John, 2 John or 3 John, not with any other Bible books.
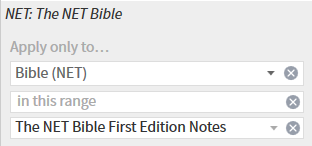
Example 2: Prioritizing a bible for a specific book
You may want to use a specific bible for references from a certain book.
This example will ensure that only “The NET Bible” is used with “The NET Bible First Edition Notes”.
- If “The NET Bible” is already prioritized, drag it to the top of your Bibles list, else drag it to the top from Library.
- this ensures that other bibles are not used for this purpose
- In the Prioritize pane, right click on “The NET Bible” and select Set prioritization limits (advanced).
- In the of this type box, click the down arrow and select Bible (NET).
- In the from this book box, click the down arrow to get a pop-up menu of books in your library.
- In the Find box type Net Bible and select “The NET Bible First Edition Notes”:
- If “The NET Bible” was previously prioritized, drag it from Library to its previous location in the list
- this ensures it will be used with other books, as normal.
Now you can verify that the new prioritization is working:
- Open “The NET Bible First Edition Notes” from Library
- Click on a bible reference.
- “The NET Bible” should open, and not your preferred bible.
Creating Headings for your Categories
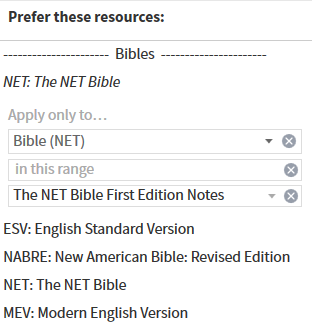
The heading ——————Bibles—————— in the above list comes from a specially named Personal Book (PB).
Follow these steps if you want to have headings for all your categories:
- Create a docx file with at least one line of text
- use this file for each heading PB that you create.
- Click on Add book in the Personal Books tool.
- In the Title box type what you want as the heading for your Prioritization list.
- For Type select Monograph.
- Click on the Add file... button and select the docx file that you created above.
- Click the Build book button to create the PB.
- Then drag your heading PB into your Prioritized list.
Note that you must recompile the heading PB’s for each installation unless you Upload them.