Clippings
Updated for Logos 10+
Page Contents
What are Clipping documents?
- Clipping documents are as they suggest, a document where you add one or more clippings.
- Think of the document as a collection of Index cards with notes.
- A Clipping doc is useful to collect information from your different resources relating to a specific topic or idea.
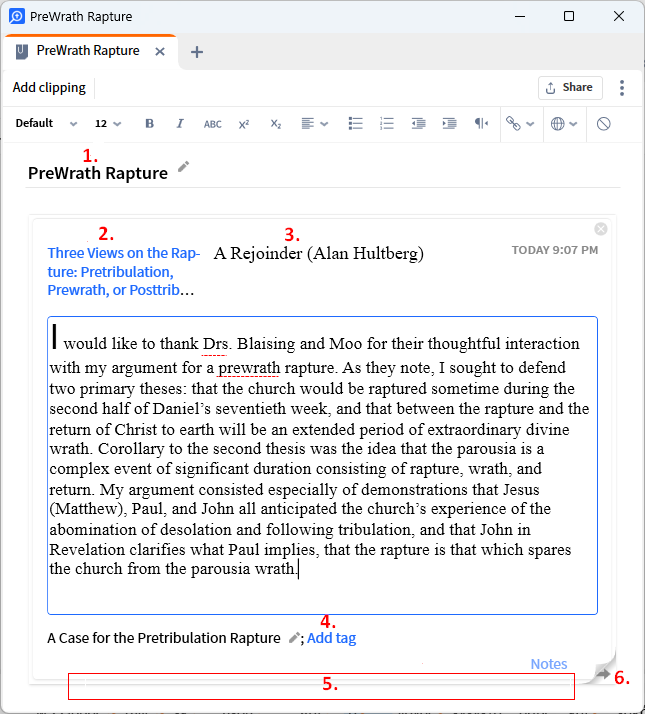
- Title for the Clipping document.
- Link to resource where this came from.
- The article title or pericope from the resource (editable)
- Tags relating to the Clipping document.
- The area where you can add a Note about this clipping.
- Link to flip the clipping/card over to back.
- The back side of the Clipping displays:
- Bibliographic information.
- Citation style (changeable).
- Link to Copy bibliography info
- You cannot add pictures or images to your clipping.
- You can add Notes to each clipping within your document.
- You can tag each clipping to help you find it.
- A date is stamped on each clipping when it is added.
Creating a new Clippings Document
- Open the Documents menu.
- Click New and select Clippings.
- Click on the Title area to give it a name.
Opening an existing Clippings document
- Open the Documents menu.
- In the Find box type clipping or part of the title of your document.
- Locate your Clippings document and click on it.
Adding clippings to your Clipping document
- You can add text based info from any of your resources to a Clipping document.
- You cannot add pictures or images to your Clipping document.
- Your new Clipping document should be open.
- Make sure your Clippings document is open.
- Select the required text in the resource.
- Right click on the selected text.
- In the Context menu, click Selection on one side.
- On the other side, click your document under Add a clipping.
- Logos will add a clipping at the end of your document.
- Make sure your Clippings document is open.
- Select the required text.
- In the Clipping document, click on the Add clipping button.
- Logos will add a clipping at the end of your document.
Dragging text into the Clippings doc
This is the only way to insert a clipping at the desired location.
- Make sure your Clippings document is open.
- Select the required text in the resource.
- Drag the selected text to the desired location as indicated by a black line.

Managing your Clippings
How to rearrange your clippings
- Click your mouse at the top of the clipping.
- Drag it to the new location as indicated by a black line.
- Release the mouse button.
How to delete a Clipping
This deletes a single clipping within your document.
- Hover your mouse over the top of a clipping.
- Click on the red X to delete it.
If you accidentally delete a clipping, you can restore it by pressing Ctrl+Z on your keyboard.
But you must do this immediately after deleting the clipping.
How to delete a Clippings document
- Open the Documents menu.
- In the Find box type clipping or part of the title of your document.
- Right click on the Clippings document.
- Cick on Delete.
How to find a clipping in your Clippings document
- You can add one or more tags to a clipping, and they can be used to help you locate that clipping in a document with many clippings.
Setting a tag in a clipping
- Click on Add tag.
- Enter a name for the tag.
- It should be as unique as possible to aid searching.
- Repeat for any other tags you want.
Using Find to locate a clipping
- You can use the Find feature to locate a clipping via its tags, or find words or phrases that appear in a clipping.
- Find will show one or more clippings with content that matches what you typed in the Find box.
- Open the panel menu of your document.
- Click on Find (in this panel).
- or use the keyboard shortcut Ctrl+F
- In the Find box, type your tag value or a word/phrase.
- Logos will show the clipping(s) that contain this tag/word/phrase.
Using Search to locate a clipping
- Use Docs Search to locate text or tags in a clipping.
- Open the Search tool and select Docs.
- In the Search box, type mytag: followed by your tag value e.g. mytag:prewrath.
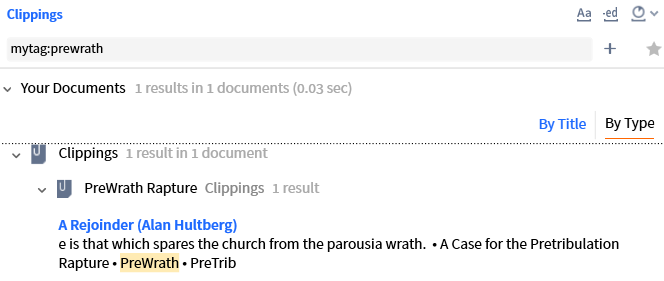
- Click on the result or the link to the article Title.
Adding / Changing text in a clipping
You can modify or add text within your clipping and its Notes and create hyperlinks.
Use the standard text editing controls in the toolbar.
- Click in your clipping to enter Edit mode.
- You should limit changes to the clipping as that is quoted text
e.g. use ellipsis... to indicate omitted text.
- Click on the Notes button or within the text at the bottom of a clipping.
- Then add / change your text in the Notes area.
Creating Hyperlinks
- Click in the text area and enter the text that you want as a label for the hyperlink.
- add at least one space character after the text
- Select the text that you want to make into a hyperlink.
- In the resource that you want to link to, ensure your desired location is at the top of the panel.
- Open the Panel menu and select the L4 hyperlink address.
- Click the hyperlink icon in the toolbar of your clippings document.
- on hover it will display “Address”
- Paste the hyperlink address into the drop down box.
- Notice that your text in the clipping has turned into a link.