Reading Plan (Basics)
Updated for Logos 9+
Page Contents
What is a Reading Plan?
Overview
A Reading Plan is a tool of Logos which allows you to setup the reading of a Bible or book in a specified time period (or number of sessions), and aids you in tracking your progress. You can setup as many reading plans as you like. This wiki page will provide the basic information in setting up a reading plan and using the reading plan. The Chapter Reading Plan and the Flexible Reading Plan are the main types of Plans, with the former being very specific and easy to set up.
In a Flexible Reading Plan you can read a whole book or a part of a book, and you can choose which days of the week to read the book e.g. daily, every weekday, or on set days; which means you could have another Plan for the remaining days of the week. Whilst it offers a great deal of flexibility, you might find that Logos will divide your readings across the specified time frame in a way that you did not want. So you should consider the Plan with Customizable Sessions as it allows a variable number of specific readings in a session.
Selecting the portion of the book to read
Except for the Chapter Reading Plan, Logos provides a method for breaking up what you read in a book. If you are setting up a plan for a Bible, then you can break it down by Bible book/chapter/verse, and the Flexible Reading Plan will try to divide your reading into equal parts over the specific/calculated number of sessions.
If your non-bible book is indexed by page number, you can specify which pages that you want to read. So if you want to read a multi-chapter section of a Systematic Theology book, you could specify which page number to start with and which page number to stop with. Or you could let Logos handle this as a Chapter Reading Plan.
Setting up a Reading Plan
Logos provides a Reading Plan editor. You will use this when setting up your reading plan, and you can make further changes until you commence reading. After that, Logos may reset your Plan. So it is best to complete editing before you actually start your reading.
Starting a Flexible Reading Plan
- From the Documents menu:
- click on the New button
- select Reading Plan.
- select Generate a Reading Plan
- From the Home Page:
- Click the + icon on the right side of the Dashboard
- Select Reading Plan.
- Click Start a new reading plan
- Select Generate a Reading Plan
Logos will open the Reading Plan editor:
The Plan is initially started for your Preferred Bible, but the name will automatically be changed
when you choose a different resource, so there is no need to rename it at this time.
Selecting your book
The first thing that you will need to do in the Reading Plan editor is select which book that you want to read.
- Click on the title in the toolbar:

- You can use the Find box in the drop down, which is similar to the Library tool, to select your resource:
- start typing the title of the book e.g. holman quicksource; or
- You can type a filter like title:quick.
- Note that you can change the Library view from the default Tile view to Details or Cover.
- After you have selected your book, it will appear in the editor:

- There is a slight difference for Bibles:
- Note that Logos has changed the name of your Reading Plan, but there is no need to change the name at this time.
Reading specific parts of a book
There are differences between Bibles and non-Bibles so:
Selecting how often to read your book
Now you have to decide how often during the week that you want to read your book.
- To the left of the start date, click on the day field:
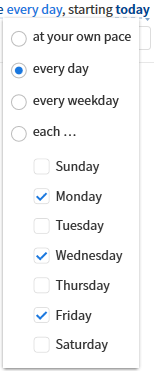
- Select the appropriate radio button:
- at your own pace allows you to read when you like whilst Logos tracks your progress:
- the default is every day of the week;
- every weekday allows you to read Monday through Friday;
- each ... allows you to select one or more days during the week.
Selecting when to finish reading your book
Now select the date when you want to finish reading your book.
Note that today is the default start date, and that can be changed after this.
- In the editor to the right of finishing click on the date:
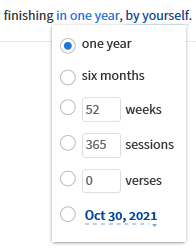
- Click the appropriate radio button:
- default is one year; or
- click six months; or
- enter the number of weeks that you want; or
- enter a number of reading sessions; or
- for Versified books only enter the number of verses per session that you want; or
- Click on the date shown to set a finish date.
Logos will show you a calendar for this.
Selecting when to start reading your book
Now you will need to select the date to start reading your book.
- In the editor to the right of starting click on the date (default is today):
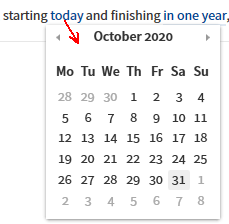
- Use the arrows to locate the month & year.
- Then click on the day that you want to start.
Completing the Plan
Finally decide whether you will read by yourself, or click on the field to select one of your Faithlife Groups.
Now that you have entered enough information for Logos to compute your Reading Plan, press the Start button
(the Plan will now be shown with an Edit button).
Reviewing the Plan
You should review your Reading Plan to see if it suits your needs. Making changes after you start reading your book will result in losing the markings for what you have already read. So you should determine now if you need to make changes to the time frame or how you want to read the book.
Notice that you can view the Plan in a Calendar when you click one of the three choices next to the name of the Plan:
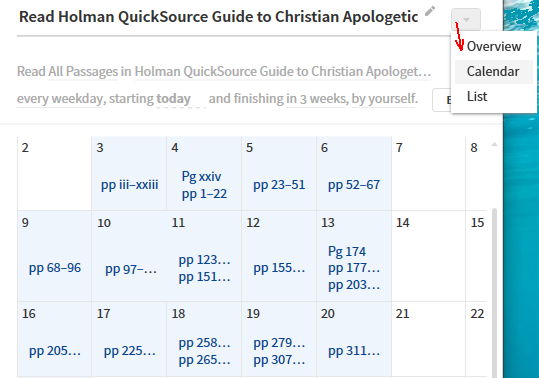
- Notice that Logos has renamed your Reading Plan. You can rename your plan here, but if you make changes
Logos will automatically rename your plan again.
- Use the scroll bar to view your plan.
- You will see link(s) for each day’s reading.
- You may see multiple links for a non-bible because there are gaps in the page numbers (as above).
- Click on a link to open your book to that day’s reading location.
Starting a Chapter Reading Plan
This option is specifically designed for reading monographs by chapter (not chapter + verse), but it has few options.
- From resource:
- Open its Information page via the Panel menu.
- Click Start Reading Plan.
- From Library
- Right click the resource
- Select Start Reading Plan.
- Open the Information pane for the resource
- Select Start Reading Plan
Logos will generate a reading plan by Chapter.
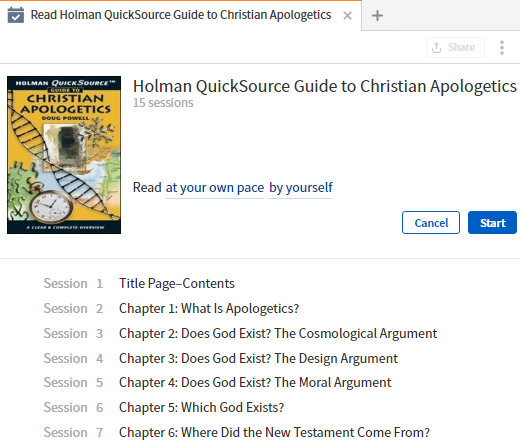
The number of sessions is fixed by the chapters in the book, but you can change how often you read the book. The default
at your own pace means that you can read when you like whilst Logos tracks your progress.
You can choose to read by yourself or click the field to select one of your Faithlife Groups.
Then click Start to begin your reading.
| Do not edit the plan after this, as you will lose the chapter sessions and lose your reading progress. |
|
A Reading Plan with Customizable Sessions
- From the Documents menu:
- click on the New button
- select Reading Plan.
- select Custom Reading Plan
- From the Home Page:
- Click the + icon on the right side of the Dashboard
- Select Reading Plan.
- Click Start a new reading plan
- Select Custom Reading Plan
Logos will open the Reading Plan editor:
Make sure that the Read starting date is correct (default is today).
Click Add to quickly add readings from another Reading Plan or Passage List (Clippings are not recommended/considered here). The imported sessions/readings will begin at the Reading session date, which should be chosen with care.
- Reading Plan
The sessions, readings and breaks will be reproduced, but adherence to weekday or specific day readings depends on the Reading session date. The Plan’s resource will be used for the readings.
- Passage List
Each passage is added to successive sessions beginning at the Reading session date. This is ideal for a plan with no breaks, otherwise you may have to use several lists and use the Reading session date to introduce breaks. Your preferred bible will be used for the readings.
Note that you will need another List to introduce second readings into the sessions, and another List for the third reading, etc. Adjust the Reading session date before adding each list e.g. the second readings could start at Day 6 whilst the third readings have to start at Day 1 (the Read starting date).
When the Plan is complete, click the Done button.
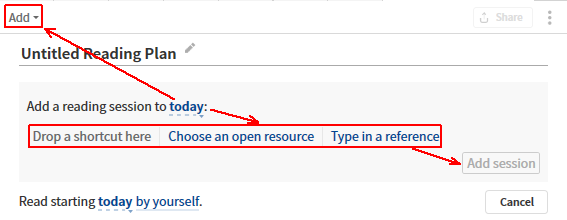
Manually Adding Readings & Sessions
This affords the greatest flexibility as you can create sessions, or add readings to existing sessions without restriction i.e. you can have sessions with a variable number of readings.
You can add readings via Drop a shortcut here, Choose an open resource and type in a reference. If you type a reference, the preferred resource will be used for the readings. The others can use a specific resource for the readings.
When you have finished adding readings, click the Add session button to create (or add to) the session indicated by the Reading session date. You can adjust this date to create breaks.
- Choose an open resource
Go to the required passage/section in your open resource. If you select some text that will be your reading. Otherwise, the active reference (in the reference box) will be used e.g. if you enter Mt 2:12-16 that will be your reading.
- Drop a shortcut here
Rather than selecting a resource from a list, drag its tab to this location and drop it.
- Type in a reference
Click on this and type a bible reference into the box. A range is accepted, but multiple bible passages (separated by comma or semi-colon) are not accepted. The preferred resource will be used for the reading.
Whilst this method can be used to laboriously create a Reading Plan, it can also be used to add more readings to an existing Plan, imported via the Add menu. Use Choose an open resource to ensure the same resource is used.
When the Plan is complete, click the Done button.
Editing the Plan
Edits/corrections can be made even after you have begun to use it i.e. the plan will not be reset.
- Open the Plan from the Docs menu and click the Edit button.
- To correct a reading:
- hover over the relevant session and remove it by clicking on the x with a red background.
- re-enter the readings for the session using Choose an open resource.
- ensure the Reading session date is correct and click the Add session button.
- To add a Session:
- adjust the Reading session date to a date after the last session.
- enter the readings for the session using Choose an open resource.
- click the Add session button.
- Click the Done button when you have finished.
Opening up a Reading Plan to read
First, ensure that the Reading Plan is checked in the resource’s Visual filters menu.
From your book
- Open your book to the location of your current reading.
- If you don’t know where your current day’s reading is located, then use one of the methods below.
From the Home Page
Opening from the Home Page is the preferred method.
- Open the Home Page
- Locate your Reading Plan in the Dashboard
- If your Reading Plan is not there, click on the Customize menu, and then on Reading Plan.
- Locate your Reading Plan, click to check it and then click Add.
- Click on the card to have Logos open your book to the day’s reading.
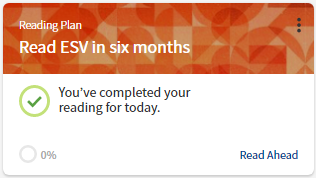
- If you want to Read Ahead, just click on this link.
- Open the Documents menu.
- Locate your Reading Plan and click on it.
- Click on List view if necessary.
- Click on the Today link to open your book to the current reading location.
If you have already read this location and forgot to mark it, click on the box to mark it read.
- If you are behind you will see a red Exclamation mark (!).
You can click on it to mark it as read.
Using the Reading Plan in your book
If you have not used a Reading Plan then this section will help you learn about the Reading Plan markers in your book.
When reading below if you do not see your markers, then see I don’t see my Reading Plan marker in my book.
Understanding Progress
- In the Calendar view if you hold your mouse over the next session’s reading then you will see a Done link. This will only show
when holding over the next session’s reading. You can mark that session as Done by clicking on this link,
but it would be better to do this in your book.
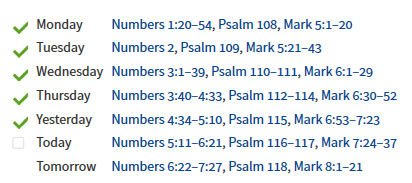
- You will see a green checkmark in the upper right corner of sessions which you have marked as read.
- In the List view, you will see a green checkmark to the left of sessions that you have marked as read.
- A check box is shown on the row for the next session. You can click the box to mark that reading as Done,
but it would be better to do this in your book.
Adjusting the Plan
Logos provides several methods to help you get your Reading Plan back on track.
- You can mark sessions as unread if you accidentally marked them as Done.
- If you are behind with your reading you can catch up by marking multiple sessions as read.
- You can adjust your Reading Plan from the time you are behind by rescheduling those sessions (thus pushing out
the completion date). This also works if you want to push your current reading forward.
Marking a day as Unread
At some point you accidentally marked some sessions as read (Done). You can correct that in your Reading Plan:
- In List view, right click a session that you want to mark as unread.
- In the pop-up menu click on Mark as unread.
- Repeat for any other sessions.
Catch up to here
Catch up to here allows you to mark one or more days as Done. You might have caught up on your reading for these sessions
(independent of the Plan) or you might want to skip these sessions. The example below shows how this works.
- Open your Plan in List view
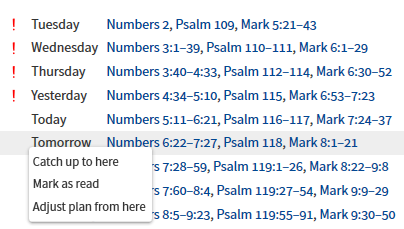
- Right click on the session, and click Catch up to here in the pop-up menu.
- Now we have caught up to a day in the future.
- All days we were behind + any future days are marked as Done (with a green check mark), and
the red Behind banner has gone from the Reading Plan.
Adjust plan from here
This will allow you to slide sessions where you are behind and move them (and the rest of
your Reading Plan) to Today or a day in the future.
This will not allow you to move future readings to start later than scheduled.
- Open your Plan in List view
- We want to adjust our Reading Plan to Tomoprrow, a date in the future, where we want to resume our reading.
- Right click on the session, and click Adjust plan from here in the pop-up menu.
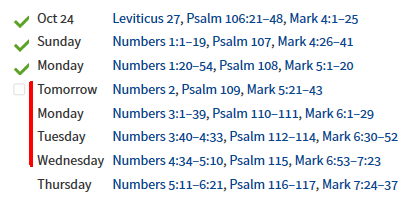
- Now notice that the four late sessions (from Num 2) have been pushed out to the future date of Tomorrow.
The Finish date would be pushed out by 5 days to accommodate this adjustment.
You do not have to be behind to push your reading forward. If you are going away and will not be able to use your
Reading Plan, you could adjust it to the date of your return.
Deleting a Reading Plan
Note: A deleted Reading Plan can be recovered from Your Documents
- Open the Documents menu.
- Locate your Reading Plan and right click on it.
- In the pop-up menu click on Delete.
How do I hide the Reading Plan markers in my book?
You may want to hide your Reading Plan markers in your book or Bible while you use it.
- Open your book or Bible in which you want to hide the Reading Plan markers.
- Click on the Visual Filters menu icon.
- In the drop down menu use the scroll bar to locate your Reading Plan.
- If checked, click on it to hide your Reading Plan markers.
I don’t see my Reading Plan marker in my book
You may have accidentally hidden your Reading Plan markers in your book.
- Open your book or Bible in which you want to show the Reading Plan markers.
- Click on the Visual Filters menu icon.
- In the drop down menu use the scroll bar to locate your Reading Plan.
- If unchecked, click on it to show your Reading Plan markers.
I cannot set page numbers for my book in the Reading Plan
Some books are indexed by Bible (or another datatype) and/or Page number. Others may be indexed by Volume/Page number.
And some may not be indexed at all.
If a book is not indexed, then the Reading Plan will force you to read the whole book.
- Open the book that you want to check for page number indexing.
- A clue that it is not indexed is that it does not have a reference box, where you would normally see page numbers or references.
- Otherwise, click Information in the Panel menu.
- Scroll down until you see Indexes on the left side.
If Page is not present, then your book is not indexed for page numbers.
Reading specific parts of a Bible
Selecting the parts to read
- Click on All Passages (or the Reference range next to Read)
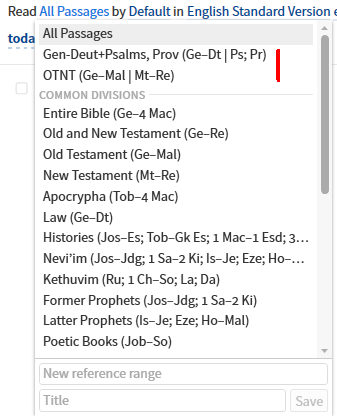
- You will see Common Divisions, or ranges that are associated with the Bible. You may also see named ranges
that you setup previously with this Bible or another Bible.
Click on one of these ranges, or setup a new reference range:
- Enter books into the reference range box in the order that you want to read them.
- Gen-Deut, Psalms, Proverbs, Matt-John will have you read Genesis through Deuteronomy, then Psalms and then Proverbs.
Finally, you will read Matthew through John. - If you want to read multiple sections each day you must use the pipe character ‘|’
e.g. Gen-Deut | Psalms will have you reading some of the Pentateuch and some of the Psalms each day. - You can name the new range by typing in the Title box and clicking the Save button.
- See Custom Readings for passages that approximate popular bible Reading Plans.
Paste them into the reference range box.
- Tip: when you have named a range you cannot easily edit it. But if you right click on the named range,
you can Copy the range info and then paste it into the Reference range box.
Divisions to Read
For Bibles only you have to decide what divisions to read in each session. This will determine
the length of text that you will have to read, or whether you prefer divisions of the same length.
You might want to Start the Plan to see the impact.
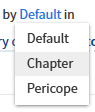
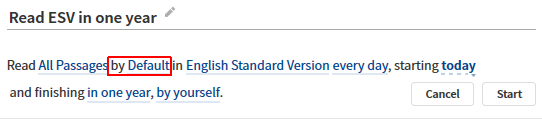
- Click on the field next to All Passages and choose between:
- Default - divisions of equal length at the verse level; or
- Chapter - by bible book chapter; or
- Pericope - pericope divisions
- Chapter and Pericope may conflict with the parts that you have selected to read if they are at the verse level.
- Chapter and Pericope can conflict with the schedule you choose e.g.
- if there are more sessions than chapters, there will be sessions with no reading.
Pericope would be a better choice. - if there are fewer sessions than chapters, you will read multiple chapters per session.
Pericope would be a better choice.
Reading specific parts of a non-Bible
If your non-Bible book is indexed by Page number then you can specify which pages to read.
You can also specify any of its datatypes.
- Click on All Passages (or the Reference range next to Read)
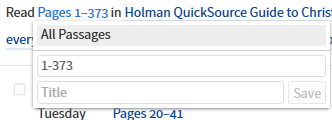
- From List view or Calendar view you may have noticed page numbers in Roman numerals e.g. Pages iii-xxiii,
and don’t want to read what is usually a Table of Contents. The view also shows 373 as the last page number.
- enter 1-373 as the new Reference range.
- Other page ranges can be entered:
- 149-225 or pp 149 – pp 225 or pg 149 – pg 225
- If your book is broken into volumes you have to enter the volume before the page number e.g.
- v 1, pg 1 – 254 or v 1, pg 1 – v 2, pg 117
- If you want to read multiple sections of your book each session, then use the pipe character (‘|’) between your sections. e.g.
- 1-200 | 201-373
- 1-200 | 240-373 where pp 201-239 won’t be read.
- You can name the new range by typing in the Title box and clicking the Save button.
- Tip: when you have named a range you cannot easily edit it. But if you right click on the named range,
you can Copy the range info and then paste it into the Reference range box.
Examples
Reading in 2 parts of the Bible each day
In this example we are going to create a Reading Plan to read through the Pentateuch, Psalms & Proverbs in the Holman
Christian Standard Bible (HCSB) in 6 months. This way we get to read two different sections each session.

- Start a new Reading Plan
- Select the HCSB bible.
- To select which portions that we want to read, click on the Reference range (usually All Passages).
- In the Reference Range box, type: Gen-Deut | Psalms, Prov.
- Gen-Deut is used to indicate that we want Genesis, Exodus, Leviticus, Numbers, and then Deuteronomy.
- The pipe character | indicates that we will read more than one section each session.
- Psalms, Prov indicates that the 2nd section is to be Psalms and then Proverbs.
- [Optional] To name our reading range:
- click in the Title box and type: Pentateuch & Psalms + Prov.
- Click on the Save button to save the range.
- Decide whether you want to read by Default, Chapter or Pericope.
- To select how often that we want to read in our Plan, we shouldn’t need to change the default of every day.
- To select when we will start to read, click on the default Today and select from the Calendar drop down.
- To set how long that we want to read, select six months from the drop down.
- Click on the Start button and Logos will setup our plan.
- Change the name of the Reading Plan if necessary.
- You will notice that we have 2 links for each day, and that the 1st one is in Genesis and the 2nd one is in Psalms.
- Scroll down to the end of the Reading Plan and notice that the last day’s readings are in Deuteronomy and Proverbs.