Finding Highlighted Text
Updated for Logos version 10+
Page Contents
Finding your Highlights
Highlight Search
- Click on Search in the Logos toolbar
- Choose Bible or Books
 from the Search toolbar.
- Select a specific resource, or a collection of resources.
- In the Search box, enter a Highlight term e.g.
- highlight:* for all your highlights
- highlight:"My Palette/*" for all styles in my custom palette.
- type highlight:Blue for the Blue style
- Start the search.
- Open the Information tool.
- Open your resource to where there is highlighted text.
- Click on the highlighted text.
- Expand the Highlights section in the Information panel:
- you can use the Add menu to include it
- Click on the Palette name to start an Inline Search for any highlight with that palette.
- Click on the Style name to start an Inline Search for all highlights with that style.
Finding Highlighted words
Using the Highlight Search
- You can use either of the Highlight search methods above.
- Use the IN operator to find a word/phrase in the Highlight e.g.
- Lord IN highlight:Blue
- “Jesus Christ” IN highlight:Blue
Field Search
- Click on Search in the Logos toolbar
- Choose Bible or Books from the Search toolbar.
- In the All... Text drop down menu, click on the arrow next to a Palette name e.g. Solid Colors.
- Click on one, or more, Style names.
- Select a specific resource, or a collection of resources.
- In the Search box, enter the word/phrase that you want to search for e.g. Lord
- Start the search.
Browsing your Highlighted text
Browsing Annotations
- Turn on the resource Visual Filter for Notes and Highlights
- Set the Navigation Choice in the Locator bar to Annotation.
- Use the vertical arrows on the Locator bar to move between highlighted text
- It will also navigate to your Notes unless the Notebook(s) you selected in the VF only contain Highlighting.
Browsing with a Visual Filter
Using a Visual Filter can be an effective way to highlight a word/phrase within your Higlighting,
as the results can be displayed with your choice of Highlighting styles.
- Perform a highlight search using any of the above methods.
- In the Panel menu, select Save as Visual Filter
- Give the Filter a name e.g. Highlighting
- Select a style from the Formatting box.
The Filter will probably be active if your resource is open. Otherwise:
- Open your resource

- Click on the Visual filters icon on the resource’s toolbar.
- In the drop down menu under the heading Visual Filters, click on the filter that you want to use.
For best results deselect any other filters.
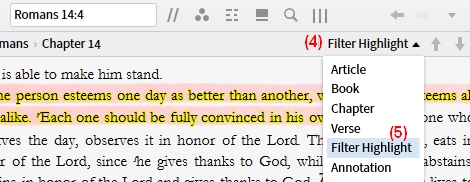
- Click on the Navigation Choice button in the Locator bar.
- In the drop down list click on Filter Highlight
- Use the vertical arrows on the Locator bar to navigate to the highlighted text in your resource.